Swift NSOperation と NSOperationQueue の基本的な使い方
NSOperationQueueクラスは dispatch_queue_t の高レベルAPIで、NSOpertionオブジェクトの実行を規制する。 NSOperationクラスは継承して使用することを目的とした抽象基底クラスになっているので、通常はNSOperationを継承したクラスを作成する。FoundationフレームワークにはNSOperationクラスを継承した NSInvocationOperation と NSBlockOperation クラスの2つが用意されている。
NSOperationQueueにNSOperationオブジェクトを追加する場合、NSOperationQueueが実行スレッドを作成するので、結果として非並行オペレーション(nonconcurrent operation)は非同期で実行される。(今回は並行オペレーション(concurrent operation)については説明しない。)
カスタム非並行オペレーションの実装
非並行オペレーションの場合、NSOperationのサブクラスで実装する内容は以下の2点
- メインタスクの実装 (main メソッドをオーバーライド)
- キャンセルされた時の実装
0~9を出力する例
class CountingOperation: NSOperation {
  override func main() {
    if !self.cancelled {
      // 0~9を出力
      for i in 0..<10 {
        print(i)
      }
    } else { // キャンセル状態の処理
        print("Cancelled")
    }
  }
}
オペレーションの実行
NSOperationQueueを使用してオペレーションを実行するには、Queueオブジェクトに addOperation でオペレーションを追加すれば、オペレーションの状態がreadyになったものからプライオリティに従って実行される。
let queue = NSOperationQueue()  // Queueの生成
for _ in 0..<100 {
  let operation = CountingOperation()
  queue.addOperation(operation)  // 0~9が非同期で出力される
}
※ Queueの生成を NSOperationQueue.mainQueue() とすることでメインスレッドに関連するキューを取得する。この時のオペレーションはメインスレッドで同期的に実行される。 queue.maxConcurrentOperationCount = 1 とした場合も、メインスレッド以外でオペレーションは同期的に実行される。
オペレーションのコンプリーションハンドラの設定
オペレーションには、タスクが終了・キャンセルしたときに呼ばれる引数も戻り値も取らないコンプリーションハンドラを設定できる。ほとんどの場合、コンプリーションハンドラはオペレーションが実行されているスレッドとは別のスレッドで実行される(例えば、メインスレッドで実行されているオペレンションのコンプリーションハンドラがメインスレッドで実行されるとは限らない)。
operation.completionBlock = {
  print("complete")
}
オペレーション間の依存関係
オペレーションには依存関係を設定することが可能。
下の例では、オペレーションAがオペレーションBとCに依存しているので、
オペレーションBとCの終了を待って、終了したら、オペレーションAが実行される。
let opA = NSBlockOperation(block: {print("A")})
let opB = NSBlockOperation(block: {for i in 0..<10 {print("B:", i)}})
let opC = NSBlockOperation(block: {for i in 10..<20 {print("C:", i)}})
opA.addDependency(opB)  // opAがopBに依存
opA.addDependency(opC)  // opAがopCに依存
let queue = NSOperationQueue()
queue.addOperation(opA)
queue.addOperation(opB)
queue.addOperation(opC)
// 最後にAが出力される
NSOperationQueueの終了検知
NSOperationQueueの終了を検知するにはoperationCountをキー値監視(KVO)する。
class SomeOperations: NSObject {
  var queue: NSOperationQueue!

  func startOperations() {
    queue = NSOperationQueue()
    // operationCountを監視する
    queue.addObserver(self, forKeyPath: "operationCount", options: .New, context: nil)
    let operation = NSBlockOperation(block: {for i in 0..<10 {print(i)}})
    queue.addOperation(operation)
  }
  // KVO
  override func observeValueForKeyPath(keyPath: String?, ofObject object: AnyObject?, change: [String : AnyObject]?, context: UnsafeMutablePointer<Void>) {
    if keyPath == "operationCount" {
      let count = change!["new"] as! Int  // 簡単のためForced unwrapping
      // Queueに追加したオペレーションが全て終了
      if count == 0 {
        print("Queue Complete")
      }
    }
  }
}
NSOperationQueue の Quality of Service (QoS)
NSOperationQueueにQoSを設定することができる。 デフォルのQoSはmainQueueから生成されたキューの場合は UserInteractive、それ以外は、Background。
参考URL
CryptoSwiftでAES暗号 (AES-256-CBC)
CryptoSwiftを使用して、
平文をSwift側で暗号化し、Ruby側で復号化する。
暗号方式はAES、鍵は256ビット長、暗号利用モードはCBC、パディング方式はPKCSを使用する。
環境
準備
適当な256ビット長の鍵(文字列)を用意する。
BDC171111B7285F67F035497EE9A081D
Swift
// 暗号化する平文
let cleartext = "Hello CryptoSwift"
// 平文をエンコードし、さらにバイト列に変換
let byteText = cleartext.dataUsingEncoding(NSUTF8StringEncoding)!.arrayOfBytes()
// 用意した鍵
let key = "BDC171111B7285F67F035497EE9A081D"
// 鍵をエンコードし、さらにバイト列に変換
let byteKey = key.dataUsingEncoding(NSUTF8StringEncoding)!.arrayOfBytes()
// IV(初期化ベクトル)、ivの型は[UInt8]
let iv = AES.randomIV(AES.blockSize)
do {
  // AES-256-CBCインスタンスの生成
  let aes = try AES(key: byteKey, iv: iv, blockMode: .CBC)
  // 平文を暗号化
  // デフォルトのパディングがPKC7になっているので、ここでは特に指定しない
  let encrypted = try aes.encrypt(byteText)
  // ruby側で使用するので、IV、encryptedを出力
  // バイト列([UInt8])をNSDataに変換し、Base64文字列にエンコード
  let strIV = NSData(bytes:iv).base64EncodedStringWithOptions(.Encoding64CharacterLineLength)
  print("IV: " + strIV)  // 出力 -> IV: lBMiK2GWEwrPgNdGfrJEig==
  let strEnc = NSData(bytes:encrypted).base64EncodedStringWithOptions(.Encoding64CharacterLineLength)
  print("Encrypted: " + strEnc)  // 出力 -> Encrypted: MHf5ZeUL/gjviiZitpZKJFuqppdTgEe+IklDgg3N1fQ=
} catch {
  print("Error")
}
CryptoSwift Note
- AES生成時に鍵長を128、192に変更すれば、AES-128, AES-192も利用できる。
- NSDataからバイト列に変換する arrayOfBytes がExtensionで用意されている
- バイト列からNSDataを生成する簡易イニシャライザ NSData(bytes: [UInt8]) がExtensionで用意されている
Ruby
require 'base64'   # Base64を使用する
require 'openssl'  # OpenSSLを使用する

# 用意した鍵

key = 'BDC171111B7285F67F035497EE9A081D'
# iOS側で生成したIVをBase64デコード
iv = Base64::decode64 'lBMiK2GWEwrPgNdGfrJEig=='
# iOS側で生成した暗号文をBase64デコード
encrypted = Base64::decode64 'MHf5ZeUL/gjviiZitpZKJFuqppdTgEe+IklDgg3N1fQ='

# Cipherインスタンスの生成

cipher = OpenSSL::Cipher.new('aes-256-cbc')
cipher.padding = 1  # パディングを有効にする
cipher.key = key    # 鍵の設定
cipher.iv = iv      # IVの設定
# 復号化
decrypted = ""
decrypted << cipher.update(encrypted)
decrypted << cipher.final

p decrypted  # 出力:Hello CryptoSwift
感想
CryptoSwiftは作者の興味と学習のために実装したと CryptoSwift: Cryptography You Can Doで言及されているとおり、暗号の参考程度にとどめるのが良いと思う。プロダクションに使用するのであれば、CommonCrypto か CommonCryptoのラッパーIDZSwiftCommonCryptoを使用する方が良いのではないか。IDZSwiftCommonCrypto の使用例 CommonCryptoのSwift製ラッパー IDZSwiftCommonCrypto を使ってみる - タコさんブログ
参考URL
Swift NSTimer の基本的な使い方
環境
- Xcode 7.3 (7.1)
- Swift 2.2 (2.1)
タイマーの生成とRun Loopに登録を同時に行う場合
// targetObjectのObjective-Cで利用できるfunc update(timer: NSTimer)を1秒間隔で呼び出す
// (または、Objective-Cクラスを継承したSwiftクラス)
NSTimer.scheduledTimerWithTimeInterval(1.0, target: targetObject, selector: #selector(TargetObject.update(_:)), userInfo: nil, repeats: true)
/* Swift 2.1の場合
NSTimer.scheduledTimerWithTimeInterval(1.0, target: targetObject, selector: "update:", userInfo: nil, repeats: true)
*/
タイマーの生成とRun Loopに登録を別で行う場合
// targetObjectのObjective-Cで利用できるfunc update(timer: NSTimer)を1秒間隔で呼び出す
// (または、Objective-Cクラスを継承したSwiftクラス)
let timer = NSTimer.scheduledTimerWithTimeInterval(1.0, target: targetObject, selector: #selector(TargetObject.update(_:)), userInfo: nil, repeats: true)
/* Swift 2.1の場合
let timer = NSTimer(timeInterval: 1.0, target: targetObject, selector: "update:", userInfo: nil, repeats: true)
*/
// run loopに登録する
// run loopに登録することでタイマー処理が開始される
NSRunLoop.currentRunLoop().addTimer(timer, forMode: NSDefaultRunLoopMode)
任意のタイミングでタイマーに登録したターゲットのメソッドを呼ぶ
timer.fire()
※ リピートしないタイマーの場合は、自動的に無効化(invalidate)される
タイマーの停止
timer.invalidate()
タイマーの参照について
タイマーはRun Loopにより強参照(strong reference)で保持されるので、Run Loopに追加されたタイマー(Scheduled Timer)を強参照で保持しておく必要はない。この時、タイマーを停止する必要があるなどの理由により保持する場合は、弱参照(weak reference)で良い。Run Loopに追加していないタイマー(Unscheduled Timer)の場合は、解放されないように強参照で保持する必要がある。
Scheduled Timerの例
class TimerExample {
    weak var timer: NSTimer?  // 弱参照

    // タイマー開始
    func startTimer() {
        timer = NSTimer.scheduledTimerWithTimeInterval(1.0, target: self, selector: #selector(TimerExample.update(_:)), userInfo: nil, repeats: true)
        /*   Swift 2.1の場合
        timer = NSTimer.scheduledTimerWithTimeInterval(1.0, target: self, selector: "update:", userInfo: nil, repeats: true)
        */
    }

    func stopTimer() {
        timer?.invalidate()
    }

    @objc func update(timer: NSTimer) {
        print("update")
    }
}
Unscheduled Timerの例
class TimerExample {
    var timer: NSTimer?  // 強参照

    // タイマー生成
    func createTimer() {
        timer = NSTimer(timeInterval: 1.0, target: self, selector: #selector(TimerExample.update(_:)), userInfo: nil, repeats: true)
        /* Swift 2.1の場合
        timer = NSTimer(timeInterval: 1.0, target: self, selector: "update:", userInfo: nil, repeats: true)
        */
    }

    // Run Loopに登録
    func startTimer() {
        if let timer = timer {
            NSRunLoop.currentRunLoop().addTimer(timer, forMode: NSDefaultRunLoopMode)
        }
    }

    func stopTimer() {
        timer?.invalidate()
    }

    @objc func update(timer: NSTimer) {
        print("update")
    }
}
Timer Coalescing (Tolerance)
タイマーのtoleranceを設定することにより、システム側がtoleranceの範囲内でターゲットのメソッドをまとめて呼びだすように調整してくれる(下の図のような感じ)。これにより省エネになる。
リピートタイマーの場合、toleranceの範囲は少なくとも呼びだし間隔の10%を目安にするのが良い。

toleranceの設定
timer.tolerance = 1.0
iOS 10 で追加された Timer API (Swift 3.0)
タイマーのコールバックがクロージャで記述できるようになった。
public init(timeInterval interval: TimeInterval, repeats: Bool, block: @escaping (Timer) -> Swift.Void)

public convenience init(fire date: Date, interval: TimeInterval, repeats: Bool, block: @escaping (Timer) -> Swift.Void)

class func scheduledTimer(withTimeInterval interval: TimeInterval, repeats: Bool, block: @escaping (Timer) -> Swift.Void) -> Timer
例
Timer.scheduledTimer(withTimeInterval: 1.0, repeats: true) { (timer) in
  print(timer.fireDate)
}
参考URL
Xcode の警告:Scene is unreachable ... の解決方法
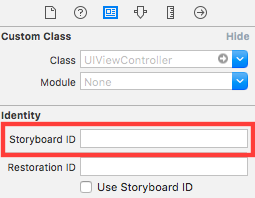
Scene is unreachable due to lack of entry points and does not have an identifier
for runtime access via -instantiateViewControllerWithIdentifier:.
この警告は!!
「ストーリーボード上のビューコントローラに instantiateViewControllerWithIdentifier でアクセスできないビューコントローラがある」と言っている。
つまり、使用しないビューコントローラならストーリーボード上から 削除 するか、使用するならIdentity inspector の Storyboard ID にIDを記述すれば、警告は無くなる。
開発効率を上げるかもしれないXcodeキーボードショートカット集
環境
- xcode 7.0

左ペインの開閉
Cmd + 0 (ゼロ)
右ペインの開閉
Cmd + Opt + 0 (ゼロ)
デバッグエリアの開閉
Cmd + Shift + Y
Assistant Editorの開閉

- Assitant Editorを開く
Cmd + Opt + ,
- 閉じる
Cmd + Enter
検索に移動

カーソルも検索窓に移動している
Cmd + Shift + F
ファイルを開く

Cmd + Shift + O (オー)
Assistant Editorで開く場合
Cmd + Opt + Enter
ファイルのライン番号に移動する
Cmd + L
開いていたファイルに戻る(進む)
マウス・トラックパッドの左(右)スワイプ
Cmd + Ctrl + → ( ← )
自動補完の開閉
Ctrl + Space
Swfitのカリー化関数 (Curried Functions in Swift)
環境
カリー化関数の構文
func 関数名 (引数) -> (引数) -> 戻り値の型 {
  return { (引数) -> 戻り値の型
    ボディ
  }
}
カリー化関数の例
カリー化されていない関数 plus
func plus(a: Int, b: Int) -> Int {
  return a + b
}
plusをカリー化した関数 plusc
func plusc(a: Int) -> Int -> Int {
  return { (b: Int) -> Int in
    a + b
  }
}
pluscを使った例
plusc(1)(2) // 出力:3

let addOne = plusc(1) // addOneの型は Int -> Int
ストーリーボードにナビゲーションコントローラ・タブバーコントローラを素早く追加するTips
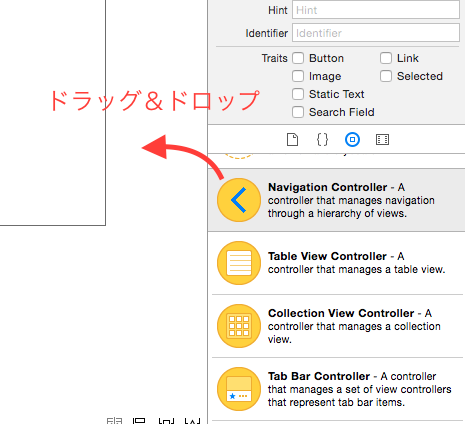
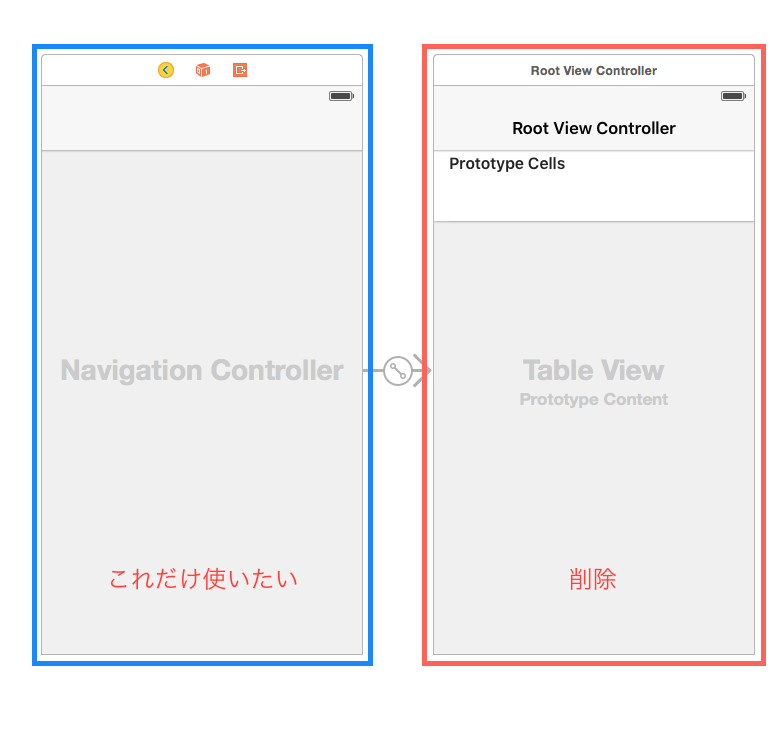
ナビゲーションコントローラ・タブバーコントローラをStoryboardに追加するとき 右側のUtilityペインの Object Library からドラッグ&ドロップするとナビゲーションコントローラ・タブバーコントローラ以外にもテンプレートのビューコントローラが付いてきて、それらを削除してから使いたいビューコントローラにセグエを繋ぐとういことをしないとけいない。
- Utilityペインから Navigation Controller (Tab Bar Controller)をドラッグ&ドロップ
- 不要なテンプレートビューコントローラを削除
- ルートにしたいビューコントローラにセグエを繋げて完成[画像1]
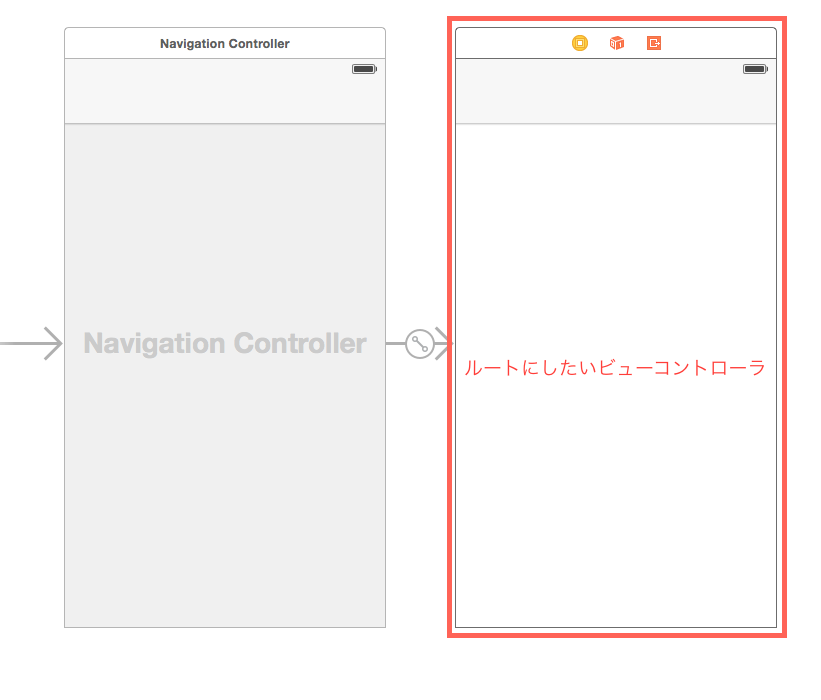
これ面倒ですよね?!
ということで、使いたいビューコントローラを一気にナビゲーションコントローラ・ タブバーコントローラに 埋め込む(Embedする)方法 を紹介します。
Storyboard に UINavigationController を追加するTip
- ナビゲーションコントローラのルートにしたいビューコントローラを選択
- Xcodeのメニューの Editor を選択
- Embed In
- Navigation Controller を選択 (ヴューコントローラを選択していないと選択できない)
- 画像1が出来上がる
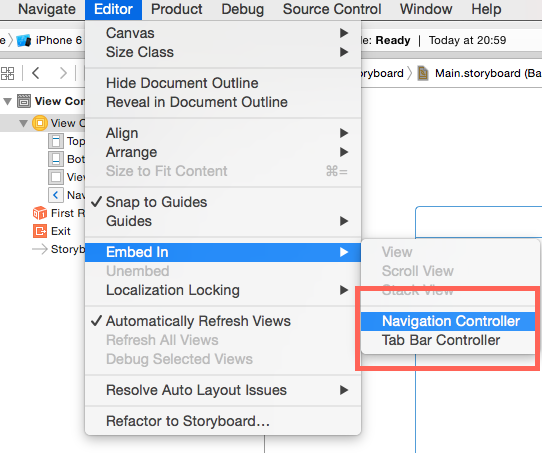
Storyboard に UITabBarController を追加するTip
タブバーコントローラの追加もナビゲーションの追加と同様に
- タブバーコントローラの子ヴューコントローラにしたいヴューコントローラを選択
- Xcodeのメニューの Editor を選択
- Embed In
- Tab Bar Controller を選択 (ヴューコントローラを選択していないと選択できない)
- 画像1のタブバーコントローラ版が出来上がる